— Kelsey —
![]()
I’ve been a professional web and graphic designer for 10 years now and it is truly my passion. The minute I was engaged, I was already eager to get back home so I could start what would be the 1.5 year design process for all of the print materials for my wedding.
I treated my wedding like a brand – a single color palette, an iconography and illustration style, and a cohesive font/design throughout every piece.
I have a slight obsession with the gray/sunflower yellow color palette and thought it was pretty fitting for a September wedding in the mountains, with the sunflower as our “main” floral. The grays allowed me to execute my mountain-scape background you’ll find on my wedding website and most print materials for this wedding.
Our wedding ceremony is also, quite literally, on the top of a mountain in New Hampshire, which has been at the heart of my inspiration throughout the entire design process. The reception takes place right next door in the woods of Maine, thus continuing the pattern of “mountain/forest wedding.”
![]()
- Signature Plus Pocket in Dark Grey
- A+ Envelope in Silver
- A2 Euro Flap Envelope in Lemon Drop
- Print Your Own Design Signature Plus Invite & 4 Inserts on Heavy White
- Print Your Own Design A+ Envelope Liner on Lemon Drop
- Invitation Mats 5.25 x 7.25 in Lemon Drop
- Custom Postage Stamp from Zazzle
- Card Stock for Belly Bands (see our belly bands here)
Shop This Post
![]()
- Exacto knife
- Glue Dots
- Silhouette Cameo for die cutting
![]()
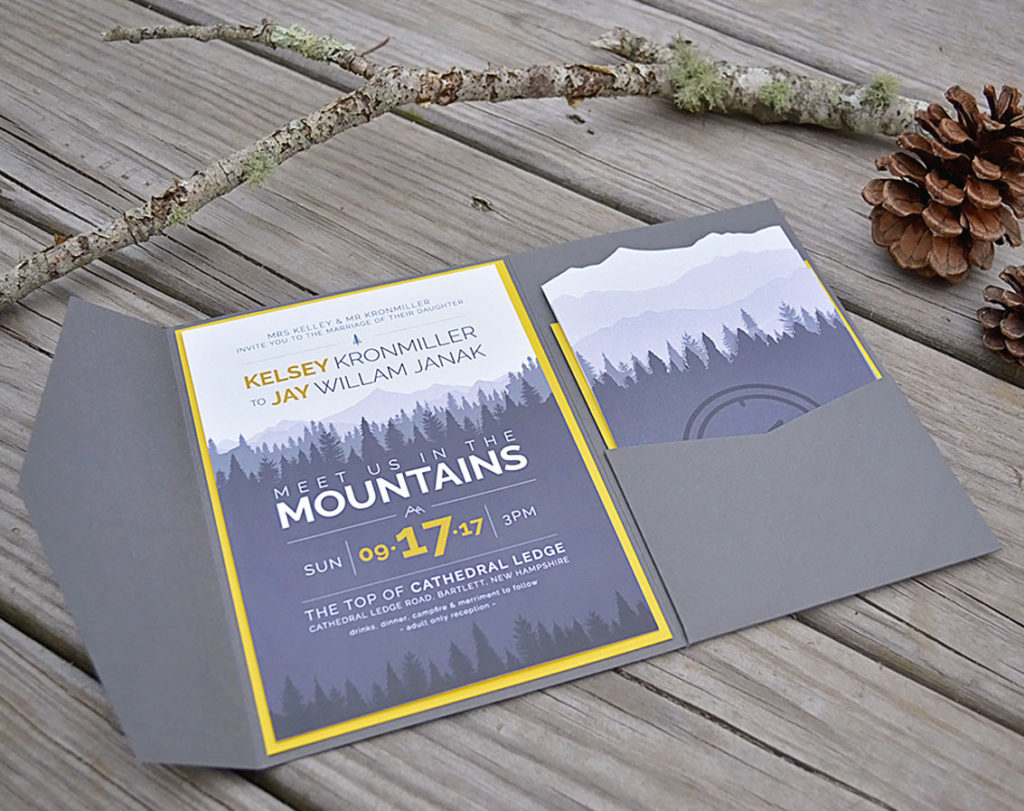
From the beginning I knew I wanted some uniqueness to my invitations, so the idea of turning my mountain and tree-scape illustration that I used for the invite itself into into die-cuts for the inserts came to life.
1.) One by one, I cut all 260 inserts with my Silhouette Cameo with plenty of mess ups along the way (which is why I ordered 10 extras of them all!)
The rest from there was relatively simple –
2.) Glue dot the invitation mat to the pocket envelope
3.) Glue dot the invite to the invite mat
4.) Then assemble the inserts in the correct order so that they make the mountain/tree-scape design
5.) The belly bands were also cut with my Silhouette Cameo and put together using a Glue Dot
6.) Add in the envelope liner from Cards & Pockets, a custom postage stamp from Zazzle, and a custom return address stamp on the back of the envelope, and they were good to go.
Congratulations, Kelsey & Jay! Thank you for sharing your DIY Story with us!
Save to Pinterest:
At Cards & Pockets we love DIYers. We also know that one of the best ways to be inspired is to see and learn about other people’s experiences. We’re excited to share stories of our customers unique DIY invitation process.
Do you have a unique DIY story for your invitations? We would love to hear more about it. Simply visit our “My DIY Story” entry page and fill out the submission form and you could be selected for our next featured story!
Be an inspiration, share your story today!


