— Adrianna —
![]()
Our venue is the gorgeous Christmas House Inn in Rancho Cucamonga, a historic home built in 1904. We are getting married in March and I wanted our invitations to reflect the charming, romantic nature of a spring wedding using floral elements that will be mirrored in the bouquets and centerpieces on the day of the wedding.

My bridal party was a huge help in the assembly of my invitations, and I wouldn’t have been able to complete them so quickly without the help of my mother and sister!
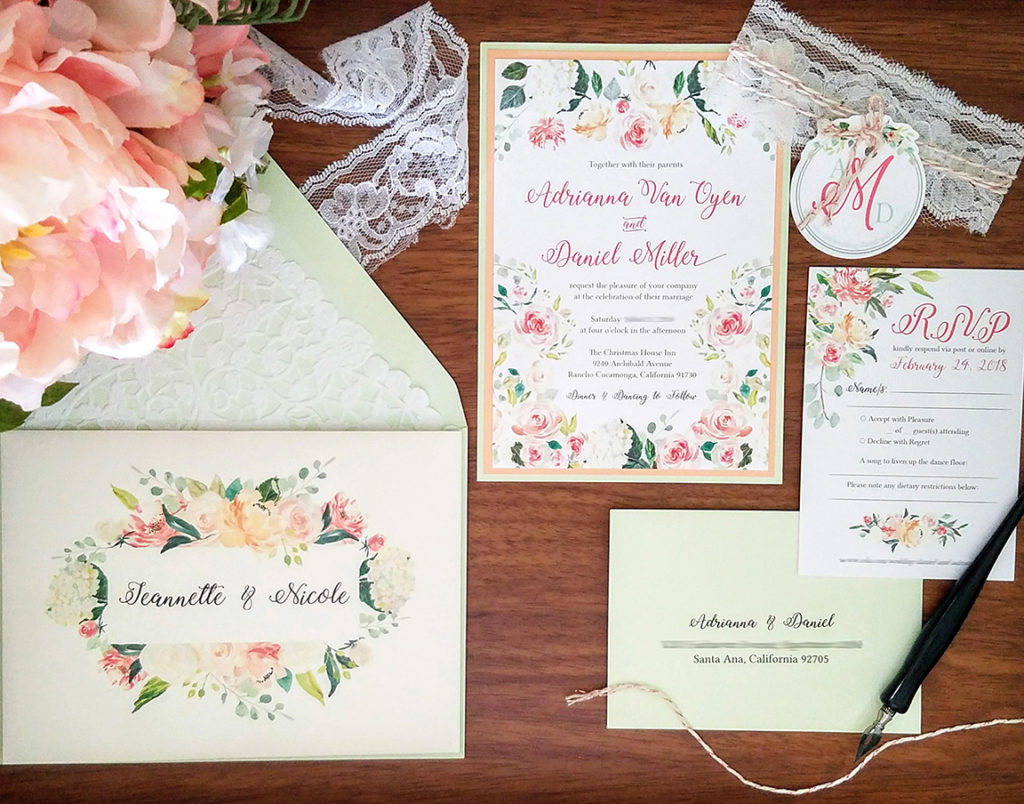
I used a graphics set purchased from Creative Market to design the invitation, RSVP card, monogram tag, address label, and outer envelope monogram seal. Of course, Pinterest was a huge inspiration and I probably spent hours pouring over gorgeous photos of invitations while creating my own inspiration board to reach a finalized design theme.
![]()
- Print-Your-Own-Design Invitation Cards (4.5 x 6.5″) on Snow White
- Print-Your-Own-Design RSVP Cards ( 3.5 x5″) on Snow White
- A7 Inner (Ungummed) Envelopes in Cream
- A7.5 Outer Envelopes in Pistachio
- RSVP Euro Flap Envelopes in Pistachio
- 4.75 x 6.75 Invitation Mat in in Peach
- A7 Panel Card in Pistachio
- Lace for Bellyband
- Rose Gold Baker’s Twine
- Address Labels
- Monogram Seals
- Doilies
Shop This Post
![]()
- I ordered the panel invitation to be assembled with Cards and Pockets’ mounting service (well worth the cost in time it saved us).
- I printed on all of the envelopes using an HP M252dw LaserJet Pro Color Laser Printer at home.
- RSVP stamp inserts and monogram tags for the belly bands were cut out with my Cricut Explore Air.
- Spray adhesive was used for the doily liners, and a hot glue gun for the lace belly bands.
- Scissors of course to cut the lace and twine and a paper slicer to cut the doilies to size.
![]()
1.) I used Adobe Photoshop and Illustrator and online templates to create custom elements (invitation, RSVP card, address labels, monogram tag and seal). I also purchased a graphic pack from Creative Market that perfectly matched the colors and flowers I’m going to use on the day of our wedding.

2.) Print on each set of envelopes; outer with recipients’ addresses, inner with a floral frame and recipients’ names, RSVP with bride’s & groom’s name and address using at-home printer and Microsoft Word Mail Merge function.

3.) Prepare additional materials/accents. Cut lace (12 in.) and twine (42 in.) for belly bands. Print custom monogram tags and RSVP stamp inserts on white cardstock, and cut with Cricut Explore Air.
4.) Wrap lace around 5×7 panel invitation and adhere overlapping ends with hot glue gun (using low temperature setting), making sure to use a piece of removable plastic to prevent any glue from adhering to the invitation and removing it once the glue has cooled.

5.) Wrap twine around invitation three times and then secure with a knot in front. Slide on monogram tag and secure by tying a bow with the twine, knotting the ends to prevent fraying.
6.) Place RSVP stamp insert into corresponding envelope and customize RSVP cards as needed (I numbered each one on the back to avoid RSVP confusion and to the front added the number of guests invited for each recipient). Slide RSVP card under flap of envelope and insert complete RSVP assembly beneath the lace and twine belly band.

7.) Line each outer envelope with 8 inch, square doily using spray adhesive; this must be done after the envelope has been printed on with recipients’ details. YouTube tutorial that was followed here: https://youtu.be/0vWhnHm7B0U
8.) Take finished invitation and RSVP package and insert into inner, ungummed envelope personalized with floral frame and recipients’ names.
9.) Insert inner envelope into matching outer, gummed envelope. Seal envelope and, for additional security and added flair, adhere closure with customized monogram seal.

10.) Apply correct postage and custom return address label
to front of outer envelope and put your mind to ease by dropping off at your local post office.
I cannot recommend ordering paper samples and proofs enough- it helped me from the first stages of planning to physically hold the papers and products I was visualizing and to see how my custom design would look once printed on various papers.
Also, make sure you take a mock-up invitation with you to a post office when purchasing postage so you ensure that you have enough for each invitation and the RSVP cards; I mailed a good number of mine internationally too, but didn’t want to use this year’s Global Forever stamp, so it was extremely helpful being able to ask any and all postage questions to the post office workers who helped me.
Congratulations, Adrianna & Daniel!
Thank you for sharing your DIY Story with us!
Save to Pinterest:
At Cards & Pockets, we love DIYers. We also know that one of the best ways to be inspired is to see and learn about other people’s experiences. We’re excited to share stories of our customers unique DIY invitation process.
Do you have a unique DIY story for your invitations? We would love to hear more about it. Simply visit our “My DIY Story” entry page and fill out the submission form and you could be selected for our next featured story!
Be an inspiration, share your story today!


