![]()
— Jennifer from Michigan —

![]()
Before I was even engaged I had found a designer wedding invitation I loved, but couldn’t afford the price tag! A close friend who is also a great graphic designer helped replicate the design and customize the invite to our wishes. I had seen the pocketfolds before and really liked them, too! Through Cards and Pockets we were able to have the best of both worlds!
My graphic designer friend designed all the invitations, then my fiance, me, and our matron of honor put them together! It was definitely a big undertaking– my advice for other brides would be to pay the small fee to have your invitations assembled!
![]()
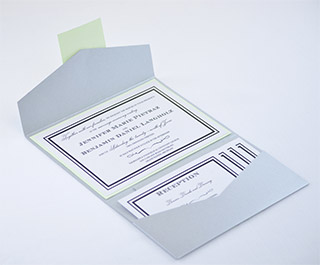
- Silver Retangolo Pocket Invitations
- Pistachio Mat
- Blank Invitation Card (Crystal)
- Blank Inserts
- Pistachio Belly Band
- Blank 2.25×2.25 Monogram Square (Pistachio)
- Crystal Card Stock
- Silver A7 Envelope
- Silver RSVP Envelope

![]()
- Double Sided Tape (I used a generic double sided tape dispenser from a local arts and crafts store to adhere all the products together) .
- Address Stamp (I found a great address stamp on Etsy)
![]()
1. Mounting of the Invitation Card
First we attached the printed invitations to the 4 3/4 x 6 3/4 matting paper, then to the rectangolo pocket invitations using the double sided tape dispenser.
2. Attaching of Belly Bands and Monograms
Next we attached the belly bands to the pocket invitation, and then the monograms to the top of the belly band. I had purchased the blank 2.25×2.25 monograms in pistachio. I printed our logo at a local print shop on crystal paper, then cut them out myself with a paper cutter. The printed monogram was attached to the top of the 2.25×2.25 paper.
3. Putting it all Together:
We stuffed in all the inserts to the pocket, and sealed them up! I spent a few weeks working on the invitations, just a little at a time…it was a nice chance to drink some wine and catch up on “Downton Abbey”!

All the inserts were sized 3 1/2″ x 5″
![]()
Find the Best Adhesive
I originally purchased an Elmer’s brand adhesive dot stamper…I thought it worked well until I tried a different product. The “E-Z Runner” was a MUCH better product and provided better adhesive. [Cards & Pockets also sells the GlueGlider Pro]
Plan lots of time and get help!
Have you bridesmaids over and make an assembly line. The process was a lot more tolerable when I had help. And be proud of the finished product! I know mine may not look as professional as some others, but I’m really proud of the way the turned out…exactly as I envisioned!

![]()
At Cards & Pockets we love DIYers. We also know that one of the best ways to be inspired is to see and learn about other people’s experiences. We are excited to share stories of our customers unique DIY invitation process.
Do you have a unique DIY story for your invitations? We would love to hear more about it. Simply visit our “My DIY Story” entry page and fill out the submission form and you could be selected for our next featured story!
Be an inspiration, share your story today!