
 Vellum is making a comeback! Using this semi-transparent paper will give your DIY wedding invitations a beautifully light and airy look. It’s budget friendly and easy to print on with most home printers. Pair vellum with additional paper layers and a few other pretty little details for wedding invitations that are effortlessly romantic. Here’s a few ideas to get you started:
1.) Simple Vellum Wrap
If you’re a simple and sweet couple but want to add an elegant finishing touch to your invitations, try adding a subtle vellum wrap!
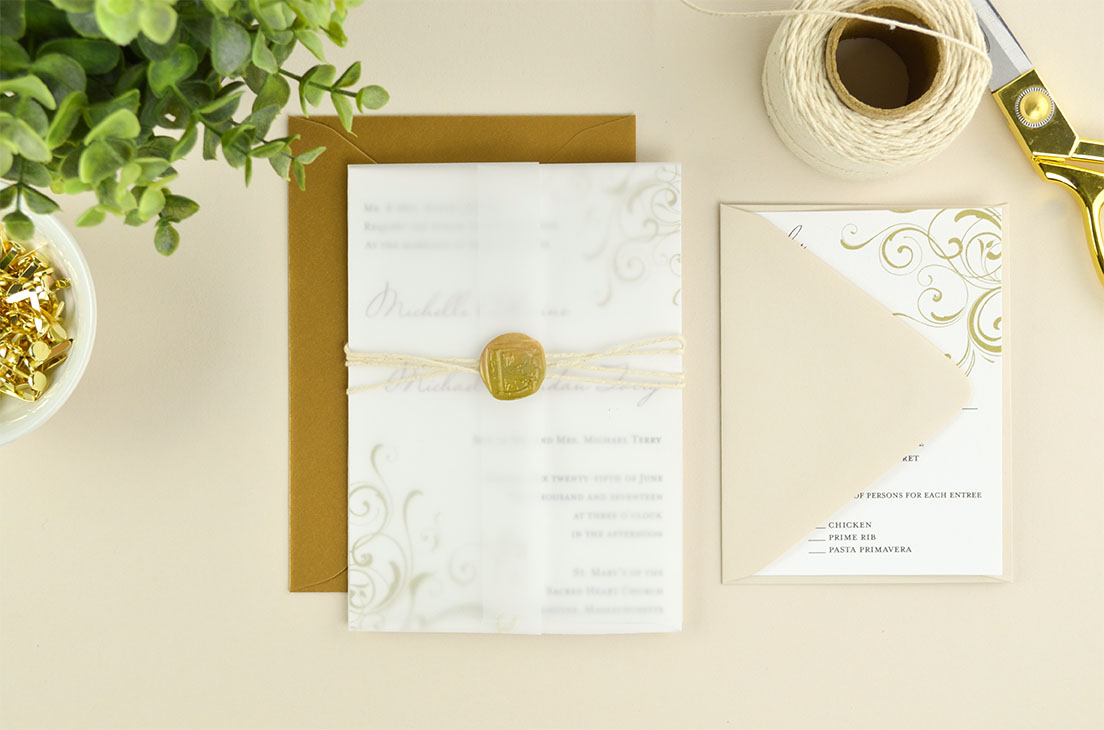 “Corner Swirls” Free Invitation Template pictured above
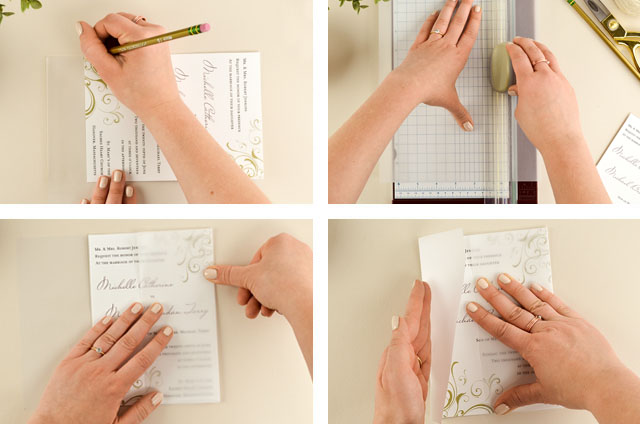
To assemble: Line up the your invitation card in the corner of an 8.5 x 11″ sheet of vellum. (The long side of your invitation should be lined up with the short edge of the vellum). Mark the height of your invitation card on the vellum with a pencil and cut with scissors or a paper trimmer.
Line up and center your invitation card on the cut vellum (The vellum should be the same height as your invitation card), and fold both sides so that they overlap in the front middle.
This look is especially pretty when combined with a wax seal, wrapped up with ribbon, or closed with a belly band.


2.) Vellum Belly Band
For a small and sophisticated embellishment, cut a sheet of vellum into strips (you pick the width!) and use as a belly band to wrap up your invitation suite with a lovely little finishing detail.

Our standard size belly band is 1 7/8,” which is what we trimmed to below.
To assemble: Once you’ve trimmed your vellum into belly bands, lay on top of your invitation card so that it’s straight and centered. Fold one side to the back, then flip over, pull the loose side tight, and line up with the folded side before folding against the invitation card. Seal with tape/a Glue Dot in the back.

Print, paint, or hand letter a design on the front of your belly band, like your wedding logo (if you have one), your names, your wedding date, or your guests’ names.


3.) Vellum Pattern Overlay
Print a design on vellum to go on top of your invitation; it’s a unique way to add decoration to a simple invitation design. It may work best to have a border design, seal/logo, your names, or something that doesn’t take away too much attention from your invitation card and details.
 “Gold Lines” Free Invitation Template above left
To assemble: Trim your invitation card and vellum overlay with a paper trimmer (they should be sized the same before printing), make sure they are lined up, and fasten with a brad to keep the two layers together. It’s easiest if you use a pin to make a small hole through both layers before inserting the brad.
 The brad itself even adds a decorative touch of gold to your invites!


4.) Vellum Printed Invitation
If your invitation design is really simple or text only, this is a great way to make it a lot more interesting. It’s also perfect if you love the layered look and want to pair different textures or patterns.
 “Simply Elegant” Free Invitation Template above left
Pick a design you want to show underneath your wedding invitation – it could be a pretty floral design, a fun watercolor pattern, a photo/drawing of your venue, a landscape, or even a texture like wood paper so that you can see the woodgrain…whatever fits you and your wedding style. Get creative! Just keep in mind that your invitation text will be on top, so don’t pick anything too busy or distracting for the bottom layer.
 To assemble: If using two printed layers – make sure your invitation and design files are sized the same; print the main invite on vellum, and the bottom design on a thicker card stock paper. Trim them both using a paper cutter, scissors, etc.
(Above, we used our real wood paper for a textured bottom layer and trimmed the vellum invitation card to be slightly smaller than the mat so that there would be a woodgrain border).
Next, place the vellum on top of the card stock design/textured paper. Fix the two layers together with a brad/paper fastener. It’s easiest if you line them up and create a hole with a pin before inserting the brad.

If you’re a hopeless romantic and a lover of layers, vellum is the perfect trend for your wedding invitations. Experiment with patterns, textures, layers, and designs – and have fun! If you don’t want to print yourself, the Cards and Pockets Print Shop would be happy to print your custom designs on vellum and/or another quality cardstock.
Here are 3 out of the 4 ways on video
We’d love to see your vellum invitation ideas! Leave them in the comments below or post them on social media and tag @cardsandpockets or use #cardsandpockets.
Happy DIY-ing!
Save to Pinterest:
